
Що стосується вибору у Photoshop, то насправді два типи людей - ті, хто вміє користуватися інструментом «Перо», і ті, хто бореться. Більшість людей відкладають навчитися користуватися інструментом «Перо» якомога довше, а інші ніколи не обходяться його вивченням, вважаючи, що це занадто заплутано, занадто складно і просто неприродно.
Зрештою, їхня робота в Photoshop страждає від цього, оскільки вони затримуються, покладаючись на інструмент Lasso, майже на все, чого вони не можуть вибрати за допомогою інструментів прямокутного або еліптичного накреслення. У цьому підручнику Adobe Photoshop ми покладемо край стражданням. Ми дізнаємось, наскільки легко насправді робити вибір за допомогою інструмента «Перо».
Тепер, коли я кажу "легко", я не маю на увазі, що ти будеш читати цей підручник і негайно перетворюватися на Майстра пера. Навчання користуватися інструментом «Перо» - це багато що, як навчитися їздити на велосипеді. Коли ви дізнаєтесь, це здасться цілком природним, і вам буде цікаво, як хто-небудь міг би не знати, як використовувати щось таке просте. Але, щоб дійти до цього моменту, потрібно трохи практики та зусиль, і читаючи кожну книгу про те, як їздити на велосипеді, ви можете навчити вас основ роботи педалей, передач та гальм, це не до того, як ви будете на велосипеді битися щоб зберегти рівновагу, що починається справжнє навчання.
Одна з чудових речей про інструмент для ручки - це те, що це не є ексклюзивним для Photoshop. Далеко від цього! Практично кожна популярна програма для редагування фотографій, графіки та макетів сторінок використовує інструмент «Перо» в тій чи іншій формі, тож, коли ви навчитеся користуватися ним у Photoshop, ви вже будете добре розуміти, як ним користуватися у багатьох інші програми також!
Де я можу знайти інструмент для ручки?
Перш ніж ми розпочнемо розмову про те, що таке Перо інструмент або як ним користуватися, слід спершу розібратися, де його знайти у Photoshop. Ви знайдете інструмент «Перо» на палітрі «Інструменти», згруповані за допомогою Інструментів форми, Інструменту типу та Вибору шляху (біла стрілка) та Інструменти прямого вибору (чорна стрілка) (див. Зображення ліворуч).
Інструмент для ручки Photoshop
Звичайно, це може поставити питання про те, чому, якщо ми можемо зробити вибір за допомогою інструмента «Перо», він не групується з іншими інструментами вибору (Прямокутний інструмент для накреслення, Еліптичний інструмент для накреслення, Інструмент Лассо тощо) на верхній частині палітри Інструменти? Чому це там з тими іншими інструментами, які явно не є інструментами відбору?
Це відмінне запитання, і там просто трапляється однаково відмінна відповідь, з якою ми дійдемо за мить.
Чому його називають інструментом «Перо»?
Одним з перших каменів спотикання, як навчитися користуватися інструментом «Перо», як і у багатьох інших речах у Photoshop, є його назва, адже зрештою, якщо є одна річ, яку знають усі, хто коли-небудь намагався її використовувати, ця річ не є ручка Принаймні, це не та ручка, яку ви зазвичай думаєте, почувши слово "ручка". Спробуйте записати своє ім’я так само, як ви можете підписати своє ім’я на аркуші паперу ручкою, і ви, ймовірно, опинитесь закрученим, заплутаним безладом і речами, що лунають один за одним (звичайно, я вважаю, що могло б бути так, як ви підписуєте своє ім’я).
 П’єр Безьє
Тож якщо воно не працює як традиційна ручка з чорнилом, чому його називають інструментом «Перо»? Засіб «Перо» насправді називали декількома речами протягом багатьох років, і, маючи на увазі, я не маю на увазі такі речі, якими ви могли його назвати в моменти розчарування. Можливо, ви чули, як це називалося Пером Безьє чи Інструментом Безьє, і це тому, що його створив чоловік на ім'я П'єр Безьє (це він зліва), французький інженер та розумний хлопець, який придумав фантастична математика, яка використовує цей інструмент під час роботи для автомобільної компанії Renault (Pen Tool був створений спочатку для допомоги дизайну автомобілів).
Можливо, ви також чули інструмент «Перо», який називається Інструментом «Шляхи», і це дійсно найбільш відповідне ім’я для нього. Інструмент ручки - це про те, щоб намалювати "доріжки". Щоб зробити вибір за допомогою інструмента «Перо», ми просто конвертуємо шлях або контури, які ми намалювали, у вибрані. Це завжди починається, проте, з шляху.
Швидкі коди, дії та фільтри Плагін: Помилка короткого коду (оголошення-основи-середина-2)
Що таке Шлях?
"Шлях" - це, чесно кажучи, щось, що може здатися трохи поза місцем у такій програмі, як Photoshop. Причина полягає в тому, що Photoshop - це насамперед піксельна програма. Він займає мільйони мініатюрних квадратних пікселів, які складають типове цифрове зображення і робить з ними речі. З іншого боку, доріжки абсолютно не мають нічого спільного з пікселями, саме тому я сказав, що вони можуть здатися поза місцем у програмі, яка використовується в основному для редагування та малювання пікселів.
Шлях насправді є не що інше, як лінія, що йде від однієї точки до іншої, лінія, яка повністю незалежна і нічого не піклується про пікселі під нею. Лінія може бути прямою або вигнутою, але вона завжди переходить від однієї точки до іншої точки, і як я вже згадував, вона взагалі не має нічого спільного з пікселями на зображенні. Шлях повністю відокремлений від самого зображення. Насправді шлях настільки відокремлений, що якби ви спробували роздрукувати своє зображення за допомогою шляху, видимого на екрані, шлях не з’явиться на папері. Крім того, якщо ви зберегли своє зображення у вигляді JPEG.webp-файлу та завантажили його на веб-сайт, навіть якщо ви зберегли зображення із контуром, який видно на екрані у Photoshop, ви не побачите його на зображенні на веб-сайті. Шляхи призначені лише для ваших очей та Photoshop. Ніхто більше ніколи їх не побачить, якщо вони не пройдуть повз ваш комп'ютер, поки ви працюєте.
Нам завжди потрібні мінімум дві точки, щоб створити шлях, оскільки нам потрібно знати, звідки починається шлях і де він закінчується. Якщо ми використаємо достатньо точок, з яких ми зможемо повернути наш шлях до тієї ж точки, з якої він і почався, ми можемо створити різні форми з контурів, саме так працюють різні інструменти для форми Photoshop. Інструмент «Прямокутник» використовує контури, з'єднані точками, для малювання прямокутної форми. Інструмент Ellipse використовує контури, з'єднані точками, для нанесення еліптичної форми тощо. Це також, як працює інструмент типу Photoshop's Type, хоча Photoshop обробляє тип дещо інакше, ніж він обробляє звичайні форми, але всі типи в Photoshop по суті зроблені з контурів. Насправді ви можете перетворити тип у фігури, що надає вам однакові параметри редагування контуру з типом, який ви отримуєте під час роботи з фігурами.
Можливо, ви також чули шляхи, які називаються контурами, і це досить хороший опис того, що таке шлях, або, принаймні, яким може бути шлях. Ми можемо намалювати квадратну стежку, і якщо ми нічого не робимо з нею, оскільки ми не заповнюємо її кольором або не наносимо на нього штрих, тоді все, що ми маємо, - це основний контур квадрата. Те саме з кружечком або будь-якою іншою формою малюємо. Сама стежка - лише контур фігури. Це лише тоді, коли ми щось зробимо з контуром, як, наприклад, заповнимо його, застосуємо обведення або не перетворимо його на вибір, що насправді шлях стає чимось більшим, ніж основний контур.
Ви можете вибрати весь шлях, використовуючи інструмент вибору шляху (також відомий як інструмент "чорна стрілка"), або ви можете вибрати окремі точки або сегменти шляху , використовуючи інструмент прямого вибору (інструмент "біла стрілка"). "Сегмент" шляху або "сегмент лінії", як його іноді називають, - це будь-який шлях між двома точками. Наприклад, прямокутна стежка складається з чотирьох точок (по одному в кожному куті), а окремі шляхи, що з'єднують точки разом уздовж верху, знизу, зліва та справа, щоб створити форму прямокутника, є сегментами шляху . Сам власний шлях - це поєднання всіх окремих сегментів шляху, що складають форму.
Це може бути трохи заплутано, тож давайте розберемося, що я маю на увазі. Відкрийте новий документ всередині Photoshop. Не має значення, який він розмір. Я виберу розмір 640x480 зі списку пресетів, але, як я вже сказав, не має значення, який розмір ви виберете. Виберіть інструмент «Перо» на палітрі «Інструменти». Ви також можете вибрати інструмент «Перо», просто натиснувши букву P на клавіатурі.
Два режими інструментів для пера
Тепер, перш ніж продовжувати, спершу нам потрібно переконатися, що ми працюємо з шляхами, і це тому, що інструмент «Перо» насправді має два різні режими роботи, і за замовчуванням він використовує інший. Якщо вибрано інструмент "Перо", якщо ми подивимось на панель параметрів у верхній частині екрана, ми побачимо групу з трьох піктограм:

Панель параметрів у Photoshop показує групу з трьох піктограм, що представляють кожен із трьох режимів інструмента «Перо».
Я знаю, я говорив, що існує два режими роботи інструмента "Перо", і все-таки, ніби для того, щоб зробити речі більш заплутаними, є три значки, але піктограма праворуч, яка є піктограмою Заповнення пікселів, є сірою та недоступною під час роботи за допомогою інструмента «Перо». Він доступний лише під час роботи з різними інструментами форми, тому нам дійсно потрібні лише дві піктограми.
Піктограма зліва - це піктограма шарів форми, також відома як "не та, яку ми хочемо", і ця вибрана за замовчуванням. Якби ми працювали з інструментом «Перо» із вибраним значком, ми б малювали фігури так само, як ніби ми використовували будь-який із різних інструментів форми, за винятком того, що замість того, щоб малювати заздалегідь задану форму, як прямокутник чи еліпс, ми могли намалювати будь-яку форму, яку ми хотіли. Як я вже сказав, ми цього не хочемо. Ми хочемо, щоб піктограма поруч із нею була піктограмою Шляхи, тому натисніть на неї, щоб вибрати її:

Підручники для Photoshop: Клацніть піктограму "Шляхи" на панелі параметрів, щоб працювати з шляхами за допомогою інструмента "Перо".
Вибравши інструмент «Перо» та вибрану піктограму «Шляхи» на панелі параметрів, клацніть один раз у будь-якому місці документа. Не натискайте та перетягуйте, просто клацніть. Після цього ви додасте невелику квадратну точку. Я збільшив його тут:

Клацніть один раз всередині документа за допомогою інструмента «Перо», щоб додати крапку.
Цей перший пункт, який ми тільки що додали, є початковою точкою нашого шляху. Зараз у нас фактично немає шляху. Все, що у нас є, є відправною точкою. "Точка" технічно називається якорем або опорною точкою, і називається вона тому, що вона закріплює шлях на місце. Цей перший пункт закріпить початок шляху до цього місця всередині документа. Оскільки ми додаємо більше точок, кожен з них прив’яже шлях до місця в цьому місці.
Додамо ще один момент. Клацніть десь усередині документа. Куди завгодно. Я збираюся натиснути десь праворуч від моєї початкової точки:

Підручники для Photoshop: Додайте другу точку прив’язки, натиснувши десь усередині документа.
Зараз я додав другу точку прив’язки і подивіться, що сталося. У мене зараз пряма лінія, що з'єднує два пункти разом! Ця пряма - це мій шлях. Як я вже згадував, для створення шляху нам потрібно як мінімум дві точки, оскільки нам потрібно знати, де починається шлях і де він закінчується, і тепер, коли ми маємо і початкову, і кінцеву точку, Photoshop зміг з'єднати дві точки разом, створюючи наш шлях.
Додамо ще кілька балів просто для розваги. Клацніть ще кілька разів на різних місцях всередині документа. Знову ж таки, не натискайте та перетягуйте, просто натисніть:
Додайте додаткові бали, натиснувши на різні місця всередині документа.
На зображенні вище я додав ще сім прив’язних точок, натискаючи на різні місця за допомогою інструмента «Перо», і кожен раз, коли я додавав його, довжина мого шляху збільшувалася, оскільки між попередньою точкою та новий пункт. Зараз мій шлях складається з дев'яти опорних точок та восьми сегментів шляху. Я міг би продовжувати клацання всередині документа, щоб додати більше якірних точок і сегментів шляху, але те, що я дійсно хотів би зробити зараз, - це закрити мій шлях, щоб він формував повну форму.
Закриття шляху
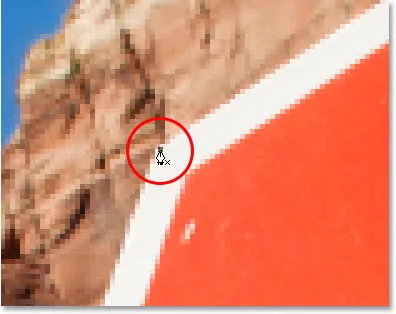
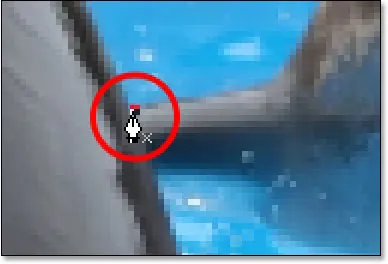
Щоб закрити шлях, все, що нам потрібно зробити, - це ще раз натиснути на початкову початкову точку. Якщо навести курсор миші на початкову точку, у правому нижньому куті піктограми з’явиться невелике коло:

Невелике коло з’являється в правому нижньому куті піктограми ручки під час наведення курсору на початкову початкову точку шляху.
Це коло говорить нам про те, що ми збираємося "повним колом" нашим шляхом, закінчуючи його там, де він почався. Щоб закрити його, просто натисніть прямо на початкову точку.
Нижче ми бачимо, що мій шлях став замкнутим шляхом і тепер є основним контуром форми:
Шлях тепер закритий, закінчуючи на початковій точці, створюючи закритий шлях.
Навіть незважаючи на те, що цей шлях намальований просто для розваги як приклад того, як намалювати основний шлях за допомогою інструмента «Перо», я легко перетворять цей шлях на вибір. Для цього нам потрібна палітра Photoshop's Paths, і ми розглянемо це далі.
Перетворення шляху у вибір
Поки ми розглядали, що таке шлях і як намалювати основний шлях за допомогою інструмента Photoshop's Pen. Але як ви йдете до вибору зі шляху?
Легко! Існує кілька способів перетворити шлях на вибір, включаючи зручну комбінацію клавіш, але перш ніж ми розглянемо швидкий шлях, розглянемо офіційний шлях. "Офіційний спосіб" передбачає використання палітри Photoshop's Paths, яку ви можете згрупувати за допомогою палітри шарів та палітри каналів:
Палітра шляхів Photoshop.
На перший погляд, палітра Paths дуже схожа на палітру шарів Photoshop, і Adobe навмисно зробила це так, щоб вам було зручніше користуватися нею. Ми можемо побачити попередній перегляд мініатюр форми щойно створеного нами шляху, і за замовчуванням Photoshop називає шлях «Робочий шлях», який, в основному, є химерним способом вимовити «тимчасовий», як якщо б ви створили інший Шлях тепер не перейменувавши цей шлях на щось інше спочатку, цей би замінили на новий шлях. У вас може бути лише один «Робочий шлях», тому якщо ви хочете його зберегти, вам потрібно двічі клацнути його ім’я в палітрі «Шляхи» і назвати його ще чимось, перш ніж створити новий шлях.
Оскільки мій шлях трохи нагадує коронку, я двічі клацну на назві "Робочий шлях", що відкриє діалогове вікно "Зберегти шлях" Photoshop, і я перейменую свій шлях на "Корона":

Ви можете зберегти тимчасовий "Робочий шлях", просто перейменувавши його.
Коли я закінчу, я натискаю кнопку ОК, і тепер, якщо я знову заглянув у палітру "Шляхи", я можу побачити це досить впевнено, мій "Робочий шлях" був перейменований на "Корона":
Палітра Шляхів, що показує, що шлях був перейменований на "Корона".
Перейменувавши його, шлях тепер зберігається і не зникне на мені, якщо я піду створити новий шлях. Також будь-які збережені шляхи зберігаються разом із документом Photoshop, тому зараз, якщо я збережу свій документ, шлях буде збережено разом із ним, і наступного разу, коли я відкрию документ, шлях все ще буде там у палітрі Шляхи.
Збереження шляху - це не те, що потрібно зробити, щоб перетворити його на вибір. У більшості випадків, коли ви використовуєте інструмент «Перо» для здійснення вибору, вам не доведеться мати жодної потреби в шляху, коли ви зробили з нього вибір, тому не потрібно буде зберігати його. Якщо ви хочете зберегти його, просто перейменуйте його на щось інше, ніж "Робочий шлях", і це збережено.
Щоб перетворити шлях на вибір, якщо подивитися в нижній частині палітри Шляхи, ми можемо побачити кілька значків. Ці значки дозволяють нам робити різні речі нашому шляху. Перша піктограма зліва - це шлях заливки кольором переднього плану, і, як випливає з назви, натискання на неї заповнить наш шлях нашим поточним кольором переднього плану. Цікаво, але це не те, що ми хочемо. Другий значок ліворуч - це шлях Штриха з піктограмою пензля, який нанесе обведення на наш шлях за допомогою будь-якої кисті, яку ми вибрали.
Це чудовий спосіб створити цікаві ефекти у Photoshop, але для того, що ми робимо тут, перетворюючи шлях у вибір, це теж не те, чого ми хочемо. Той, кого ми хочемо, - це третій значок зліва, шлях завантаження як значок вибору:
Піктограма "Завантажити шлях як вибір" внизу палітри Шляхи.
Як тільки я натискаю на цю піктограму, мій шлях всередині мого документа стає виділенням, як ніби я створив його за допомогою будь-якого з найпоширеніших інструментів вибору Photoshop:
Шлях тепер перетворений у вибір.
Це так просто! Насправді, це навіть простіше, ніж це, тому що є комбінація клавіш для перетворення шляху у вибір, без того, щоб взагалі переходити на палітру Шляхи. Коли ви намалювали свій шлях і ви готові перетворити його на вибір, просто натисніть Ctrl + Enter (Win) / Command + Return (Mac), щоб Photoshop перетворив шлях у вибір.
На даний момент вам може бути трохи очевидніше, чому, хоча інструмент «Перо» - це дуже великий інструмент вибору, він не згрупований з іншими інструментами вибору у верхній частині палітри інструментів. Причина полягає в тому, що інструмент «Перо» - це насамперед інструмент шляху. Він створює виділення, створюючи спочатку шляхи, і з цієї причини він має більше спільного з різними інструментами форми та інструментом типу, у яких використовуються шляхи, ніж у основних інструментів вибору, таких як інструмент прямокутного накреслення або ласо Інструмент, який робить вибір на основі пікселів.
Давайте розглянемо практичний приклад того, про що ми дізналися досі. Тут у нас є фотографії знаку зупинки перед деякими скелястими скелями:

Фото знаку зупинки.
Скажімо, я хотів вибрати цей знак зупинки, щоб я міг скопіювати його на власний шар. Знак зупинки складається не тільки з серії прямих, що зробить це надзвичайно просто. По-перше, мені потрібна відправна точка для мого шляху, тому я почну у верхньому лівому куті знака, клацнувши один раз, щоб розмістити початкову точку прив’язки. У цьому випадку зовсім неважливо, з чого я починаю шлях, але я почну у верхньому лівому куті:
Клацнувши один раз у верхньому лівому куті знаку зупинки, щоб розпочати шлях з початкової точки прив’язки.
Зверніть увагу, як я збільшую масштаб тут, коли клацаю. Вам буде легше робити вибір за допомогою інструмента «Перо», щоб трохи збільшити зображення. Таким чином, ви можете бути впевнені, що ви тримаєте шлях прямо в межах області, яку ви хочете вибрати.
Зараз у мене немає шляху, у мене просто початкова точка. Щоб створити шлях, все, що мені потрібно зробити, - це об'їхати знак, додавши опорну точку в кожному куті, де шлях повинен змінити напрямок. Коли я додаю кожну опорну точку, з'явиться новий сегмент шляху, що з'єднує попередню опорну точку з новою, поки я не пройду весь шлях навколо знака. Щоб закрити шлях, я просто натисніть назад на початкову початкову точку. На скріншоті нижче це трохи важко помітити, але тепер у мене є шлях навколо цілого знаку зупинки, включаючи публікацію, до якої він прикріплений, просто обійшовши по кутах, де шлях повинен змінити напрямок:

Зараз навколо зображення стоп-сигналу з'являється шлях.
Якщо зараз я заглянув у свою палітру Paths, я можу дуже чітко бачити, що у мене є шлях у формі знаку зупинки:
Палітра "Шляхи" Photoshop показує шлях, прокреслений навколо знаку зупинки.
Зауважте, як Photoshop назвав шлях «Робочий шлях», це означає, що цей шлях є тимчасовим, і я його втрачу, якщо створити інший шлях, не зберігаючи його спочатку, перейменувавши його. Навіть якщо я не створять новий шлях, я все одно втрачу його, коли закрию документ, якщо не збережу його першим. У мене немає потреби зберігати цей шлях, тому я не переживаю за нього. У більшості випадків вам також не потрібно буде турбуватися про це.
Щоб перетворити свій шлях у вибір, я натискаю на шлях завантаження як значок вибору в нижній частині палітри шарів, або я можу так само легко натиснути Ctrl + Enter (Win) / Command + Return (Mac):
Клацніть піктограму "Завантажити шлях як вибір" на палітрі "Шляхи" або натисніть "Ctrl + Enter" (Win) / "Command + Delete" (Mac), щоб перетворити шлях у вибір.
Як тільки я це роблю, мій шлях перетворюється на вибір, і тепер вибирається знак зупинки:

Знак зупинки вибирається після перетворення шляху у вибір.
Я перейду назад до своєї палітри шарів і скопіюю знак зупинки на свій власний шар, використовую комбінацію клавіш Ctrl + J (Win) / Command + J (Mac), яка розміщує знак самостійно шар над фоновим шаром:
Знак зупинки тепер скопійований на свій окремий шар.
Маючи знак на своєму шарі, я можу робити з ним все, що мені подобається, змінюючи фон іншим зображенням або роблячи фон чорно-білим, залишаючи знак кольоровим, що б я не міг придумати. Справа в тому, що мені вдалося легко вибрати знак, клацнувши по кутах за допомогою інструмента «Перо», який створив шлях навколо знака, а потім я просто перетворив шлях на вибір.
Поки ми, дивлячись на вибір виборів за допомогою інструмента «Перо» у Photoshop, ми дізналися, що «Перо» - це інструмент для вибору кожного біта, як найпоширеніші інструменти для вибору програми Photoshop, як «Прямокутна» та «Ласо Інструменти», але замість того, щоб робити вибір на основі На пікселях, як це роблять інші інструменти, інструмент «Перо» малює контури, які потім можна легко перетворити у виділення, або з палітри Шляхи, або за допомогою швидкої комбінації клавіш.
Ось чому ручка знаходиться не у верхній частині палітри інструментів з іншими інструментами вибору на основі пікселів, а замість них згрупована з інструментами контуру, як-от різні інструменти форми, інструмент типу та інструменти вибору шляху та прямого вибору . Інструмент ручки - це все про шляхи, а не про пікселі.
Ми дізналися, що ми можемо додавати опорні точки всередині нашого документа, які закріплюють шлях на місці, просто клацнувши в різних місцях інструментом «Перо», і коли ми додаємо все більше і більше прив’язних точок, ми створюємо шлях як кожну нову точку з'єднаний з попередньою точкою новим відрізком шляху. Ми також дізналися, що шлях - це те, що зазвичай називають "недрукувальним елементом", це означає, що незалежно від того, скільки шляхів ми додамо, жоден з них не буде видно на папері, коли ми переходимо до друку зображення . Вони також не будуть помітні, якщо ми відображатимемо зображення на веб-сайті. Шляхи видно нам лише під час роботи всередині Photoshop (хоча інші програми, такі як Adobe Illustrator, також підтримують шляхи). Це лише тоді, коли ми щось зробимо з контуром, як, наприклад, заповнимо його кольором, нанесемо на нього штрих або не перетворимо його у виді, що шлях стає чимось більшим, ніж просто основним, недруковим контуром фігури.
Ми побачили, як легко використовувати інструмент «Перо», щоб вибрати щось на зразок знаку зупинки, окресливши його шляхом, складеною з серії прямих сегментів шляху, а потім перетворивши шлях на вибір. Це чудово, але насправді ми ще нічого не зробили, що не могли б зробити легше з чимось на зразок інструмента Lasso, а ще краще, полігонального інструменту Lasso, який був побудований спеціально для вибору плоских однобічних фігур, як наша зупинка знак. Швидше за все, якщо у вас є якесь дивне захоплення дорожніми знаками, рано чи пізно ви захочете вибрати щось трохи цікавіше, а під "цікавим" я маю на увазі більш складне завдання. І під "викликом" я маю на увазі щось, що містить криві. Вибір криволінійного об'єкта у Photoshop зазвичай відбувається, коли ви втрачаєте повагу до основних інструментів вибору. На щастя, трапляється і час, коли інструмент для олівців справді світить!
Перш ніж продовжувати, я повинен зазначити, що все, що ми зробили до цього моменту, було досить простим. Клацніть тут, натисніть туди, перетворіть шлях у вибір, зроблено. Наступна частина, де ми потрапляємо в малювання кривих, не така проста, хоча це, звичайно, не складно, але якщо це ваш перший раз із інструментом «Перо» або у вас немає великого досвіду роботи, робота з кривими може здатися трохи неприродно і навіть трохи непосильно. Це, безумовно, тут іде аналогія "катання на велосипеді". Ви можете спочатку кілька разів відвалитися і задатися питанням, як комусь вдається це зробити, але чим більше ви практикуєтесь і чим більше дотримуєтесь цього, тим більше сенсу все це починає робити. У найкоротші терміни це здасться вам другою природою, і ви раптом зрозумієте, чому так багато людей клянуться, що інструмент «Перо» - це єдиний найбільший інструмент вибору у всіх Photoshop! Серйозно, це насправді так.
Отримання ручки на напрямних ручках
Почнемо ще раз із інструмента «Перо». Відкрийте новий порожній документ Photoshop або просто видаліть те, що ви робили до цього часу, у вже наявному документі, щоб ми починали свіжим. Потім, вибравши інструмент «Перо» та вибрану опцію «Шляхи» на панелі параметрів (пам’ятайте, що за замовчуванням використовується параметр Шари форми, тому вам потрібно переконатися, що вибрано параметр Шляхи), клацніть один раз у будь-якому місці документа, так само ми робили раніше. Цього разу, а не просто натискання, щоб додати точку прив’язки, натисніть, а потім перетягніть мишу на невелику відстань від точки прив’язки, перш ніж відпустити кнопку миші:
Клацніть де-небудь всередині документа за допомогою інструмента «Перо», а потім перетягніть невелику відстань від точки прив’язки.
Коли ви закінчите, ви побачите опорну точку, дві лінії, що простягаються від неї. На перший погляд, ви можете подумати, що нам якимось чином вдалося витягнути шлях за допомогою інструмента «Перо». Зрештою, схоже на те, що у нас є три опорні точки, одна на будь-якому кінці та одна посередині, з двома сегментами шляху, що з'єднують їх. Якщо ми придивимось трохи ближче, ми можемо побачити, що точки на будь-якому кінці трохи менше, ніж у середині, і що вони насправді мають іншу форму. Середина є квадратною, і, як ми бачили, точка прив’язки є квадратною, але ті, що знаходяться на будь-якому кінці, здаються ромбоподібними. Чи є якісь точки прив’язки квадратними, а якісь ромбоподібними?
Ні. Всі точки прив’язки є квадратними, і всі вони однакового розміру, а це означає, що ті менші точки, ромбоподібні на кінцях, не є опорними точками. І якщо вони не є опорними точками, це означає, що лінії не є сегментами шляху, оскільки для створення шляху нам потрібні принаймні дві точки прив’язки, і зараз єдиною прив’язною точкою є ця посередині. То які саме ті лінії тоді проходять від точки прив’язки? Вони направляють ручки!
"Ах, напрям ручки!" ти кажеш. "Тепер я розумію!"
… … …………….
"Зачекайте, ні, я цього не роблю. Що, до біса, ручки напрямку?"
Ручки напрямних є, ну, ручками, і вони використовуються лише при створенні вигнутих сегментів шляху. Немає необхідності в ручках напрямків під час створення прямих сегментів шляху. Зазвичай їх два, хоча іноді є лише один, і, як ми вже бачили, вони простягаються від якірних точок. Їх називають "ручками", тому що, як ми побачимо за мить, ви насправді можете схопити їх і перемістити.
Ручки керування керують двома речами. Вони контролюють кут кривої, і вони контролюють довжину кривої, і роблять це по-справжньому акуратно. Причина, як правило, дві з них полягає в тому, що одна з них контролює кут і довжину кривої, що надходить у точку прив’язки, а інша контролює кут і довжину кривої, що витікає з точки якоря.
Перш ніж ми розглянемо, як намалювати криві ручками напрямків, давайте спочатку розберемося, як керувати ручками самими, оскільки наш успіх із нанесенням кривих буде багато залежати від нашої здатності керувати ручками. Не хвилюйтесь, це, як то кажуть, ракетна наука. Є лише кілька простих речей, які потрібно навчитися. Ми вже бачили, як створювати ручки напрямків, клацнувши за допомогою інструмента «Перо», а потім відтягнувшись від точки прив’язки. Чим далі від точки прив’язки, яку ми перетягуємо, тим довше будуть ручки напрямку. Чим довше ручка, тим довше крива. Коротка ручка, коротка крива. Довга ручка, довга крива.
Одне з приємних речей, про які ви дізнаєтесь досить швидко про інструмент для ручки, - це те, що він надзвичайно прощає. Немає ніяких причин турбуватися про те, щоб виправити речі вперше, коли малювати доріжки, тому що ми можемо повернутися назад і легко виправити речі, коли закінчимо! Ви розмістили опорну точку в неправильному місці? Без проблем! Просто перемістіть його там, де вам потрібно! Ми побачимо, як це зробити за мить. Ви витягнули ручку напрямку в неправильному напрямку? Не проблема. Візьміть за ручку і поверніть її в потрібному напрямку. Знову ми побачимо, як це зробити. Чи одна з ручок вашого напрямку занадто довга чи занадто коротка? Не проблема взагалі. Просто натисніть на нього, а потім перетягніть по мірі необхідності довше або коротше (так, ми теж побачимо, як це зробити). Шляхи завжди можна редагувати, тому немає абсолютно жодних причин турбуватися про те, щоб зробити помилку чи виправити її правильно. Це не робить вас вже трохи краще?
Обертання та зміна ручок напрямків
Як я вже згадував, їх називають ручками, тому що ви можете схопити їх, як ручки, і перемістити їх. Подивимося, як це зробити. Спочатку ми розглянемо, як обертати обидві ручки одночасно. Використовуючи точку прив’язки та дві створені нами ручки напрямку, утримуйте клавішу Ctrl (Win) / Command (Mac). Ви побачите, що піктограма інструмента ручки тимчасово перетворюється на піктограму прямого вибору (біла стрілка), і це тому, що при вибраному інструменті «Перо» утримування «Ctrl / Command» стає швидким ярликом для тимчасового доступу до інструменту прямого вибору, який є що ми використовуємо для вибору різних частин нашого шляху. Потім просто натисніть на маленьку форму алмазу в кінці будь-якої ручки напрямку (натискання на "лінію" сама по собі не буде працювати, тому вам завжди потрібно натиснути на форму алмаза в кінці ручки, щоб зробити що-небудь з ним) і перетягніть його навколо точки прив’язки, щоб повернути його. Коли ви обертаєте одну з ручок, інша ручка обертається разом з нею у зворотному напрямку, схожий на пилку. Ви також можете помітити, що як тільки ви почнете перетягувати ручку, значок курсору миші знову зміниться, на цей раз в піктограму Move Tool, оскільки ми переміщуємо щось з одного місця на інше:
Утримуйте "Ctrl" (Win) / "Command" (Mac) і натисніть на кінці будь-якої ручки напрямку, а потім перетягніть ручку, щоб обернути її навколо точки прив’язки. Коли ви перетягуєте одну ручку, інша обертається у зворотному напрямку.
Ви можете відпустити клавішу "Ctrl / Command", як тільки ви почнете перетягувати ручку. Не потрібно це тримати весь час.
Щоб змінити розмір ручки напрямку під час обертання, просто перетягніть кінець ручки в бік точки опори, щоб зробити її коротшою, або перетягніть її від точки якоря, щоб зробити її довшою. Як я вже згадував вище, більш коротка ручка зробить криву коротшою, а довша ручка зробить криву довшою. Однак ви не можете змінити розмір обох ручок одночасно, тому, якщо вам потрібно змінити розмір обох, потрібно перетягнути кожну довше або коротше. Єдине, що ви можете зробити обом одночасно, - це обертати їх. Якщо ви вже відпустили кнопку миші після обертання ручок, а курсор змінився назад у піктограму інструмента ручки, і вам потрібно змінити розмір однієї з ручок, вам потрібно ще раз утримувати клавішу "Ctrl / Command", щоб тимчасово натиснути поверніться до Інструменту прямого вибору, а потім натисніть та перетягніть кінець ручки, щоб змінити його розмір:
Перетягніть кінці ручок у бік точки кріплення, щоб укоротити їх, або відтягніть їх від точки кріплення, щоб зробити їх довшими.
Тепер давайте розглянемо, як обертати ручки незалежно одна від одної. To rotate one handle without affecting the other one, first release your mouse button if you've been rotating or resizing the handles so your cursor changes back into the Pen Tool icon. Then, instead of holding down "Ctrl/Command", which moves both handles at once, hold down your Alt (Win) / Option (Mac) key and click on the end of either of the direction handles. You'll see your cursor change into the Convert Point Tool icon, which looks like a simplified arrow made of only two lines, almost like an upside down letter "v" (except that it's not quite upside down). Then, simply drag the handle around the anchor point to rotate it, just as you did before, and this time, the handle will rotate independently of the other one, breaking the connection between them:
Hold down "Alt" (Win) / "Option" (Mac) and click on the end of either of the direction handles, then drag the handle to rotate it around the anchor point independently of the other handle.
Again, you can release your "Alt/Option" key after you've started dragging. You don't have to hold it down the whole time.
You can also resize direction handles using the "Alt/Option" key in exactly the same way as you can with the "Ctrl/Command" key. If you're in the process of rotating a handle, simply drag it in towards the anchor point to make it shorter or away from the anchor point to make it longer. If you've already released your mouse button and your cursor is showing the Pen Tool icon again, you'll need to hold down "Alt/Option" once again, then click on the end of the handle and drag it to resize it.
Is there a difference between resizing the handles using "Ctrl/Command" and using "Alt/Option" to do it? Yes there is. If you haven't yet "broken the connection" between the handles by dragging one independently of the other, resizing a handle using "Ctrl/Command" will keep the handles connected together. It won't resize both handles at once, but it won't break the connection between them either so you'll still be able to rotate them together if you need to. If you resize a handle using "Alt/Option", you'll break the connection between the handles. Even if you don't rotate the handle as you're resizing it, the connection will still be broken.
What if you've broken the connection between the handles by rotating them using "Alt/Option" and then want to rotate them together again? Can you "rebuild the connection", so-to-speak, by selecting one of them while holding down "Ctrl/Command" as before? Good question, and the answer is no. Once you've broken the connection between the handles, the "Ctrl/Command" key on its own won't bring it back. You'll need to select one of the handles while holding Ctrl+Alt (Win) / Command+Option (Mac) at that point in order to move the handles together again.
Quick Summary So Far …
We've covered a lot of information here about working with direction handles, so before we move on and start drawing some actual curves, let's do a quick recap:
- To add an anchor point, simply click with the Pen Tool.
- To add an anchor point with direction handles extending out from it, click with the Pen Tool, then drag away from the anchor point before releasing your mouse button. The further you drag, the longer the direction handles will be.
- To rotate the direction handles together, hold down Ctrl (Win) / Command (Mac), which will temporarily switch you to the Direct Selection Tool, then click on the end of either handle and drag it around the anchor point. The other handle will rotate in the opposite direction.
- To rotate the direction handles independently, hold down Alt (Win) / Option (Mac), which will temporarily switch you to the Convert Point Tool, then click on the end of either handle and drag it around the anchor point. The other handle will not rotate.
- To resize handles without breaking the connection between them, hold down Ctrl (Win) / Command (Mac) to switch to the Direct Selection Tool, then click on the end of either handle. Drag it towards the anchor point to make it shorter, or drag it away from the anchor point to make it longer.
- To resize handles and break the connection between them, hold down Alt (Win) / Option (Mac) to switch to the Convert Point Tool, then click on the end of either handle. Drag it towards the anchor point to make it shorter, or drag it away from the anchor point to make it longer.
- To rotate the direction handles together after breaking the connection, hold down Ctrl+Alt (Win) / Command+Option (Mac), then click on the end of either handle and drag it around the anchor point. The other handle will once again rotate with it.
Okay, that pretty much covers the basics of how to control the direction handles. Let's see how we can use them to draw some curves!
We've covered a lot of ground so far. We know about anchor points and direction handles. We know that in order to draw straight path segments, all we need to do is lay down a series of anchor points wherever we need them simply by clicking with the Pen Tool, and as we add more and more anchor points, we add more straight sections to our path. We know how to create direction handles and how to rotate them, either together or separately, and how to resize them.
We know how to turn a path into a selection by clicking on the "Load path as selection" icon at the bottom of the Paths palette or by simply pressing "Ctrl+Enter" (Win) / "Command+Return" (Mac) on the keyboard. One thing I didn't mention yet is that regardless of whether our path consists of straight lines,
curves, or a combination of straight lines and curves, converting it into a selection is done exactly the same way, and we've already learned how to do it, which means we're well on our way to mastering making selections with the pen! All we need to do is get a bit of practice drawing curves, which is exactly what we're about to do!
Ще прокручуєте? Завантажте цей підручник у форматі PDF!
Drawing A Curve
Let's once again start fresh, either by opening up a new blank document in Photoshop or by deleting what you've already done. We're going to draw our first curve so we can put all of our newly-aquired direction handle knowledge to use. First, with the Pen Tool selected and the Paths option selected in the Options Bar, click once somewhere in your document to add an anchor point. Just click, don't click and drag. You should have one single anchor point on the screen when you're done.
Then, move your mouse cursor up and to the right of your initial anchor point. Click again to add a second anchor point, but this time, drag your mouse a little to the right of the anchor point to drag out direction handles. Hold down Shift as you drag to constrain your movement to a horizontal direction. As you drag out the direction handles, you'll see your path appearing as a curve between the two anchor points! The further you drag your mouse, the longer you make the direction handles, and the more of a curve you create:
Click once to add an anchor point, then click and drag out a second anchor point with direction handles, creating a curved path segment between the two points.
Click down and to the right of the second anchor point to add a third anchor point. This time, don't click and drag, just click:
Add a third anchor point down and to the right of the second one by clicking with the Pen Tool.
As soon as you add the third anchor point, a second path segment will appear, joining the second anchor point with the third one. And because our second anchor point has direction handles extending from it, this new path segment is also curved! We now have a nice, smooth arc starting from the first point on the left, then passing through the anchor point with the direction handles up top, and coming to an end at the third point.
One thing you may have noticed, and you can see it in the screenshot above, is that when you added the third anchor point, the direction handle extending out the left side of the second anchor point disappeared. It's still there, Photoshop simply hid it from view. To see it again, use the keyboard shortcut we've already learned to temporarily switch to the Direct Selection Tool, which is by holding down the Ctrl (Win) / Command (Mac) key, and then click on the second anchor point to select it. As soon as you do, the missing direction handle reappears as if it was there the whole time (which it was):

Hold down the "Ctrl" (Win) / "Command" (Mac) key to temporarily switch to the Direct Selection Tool, then click on the top anchor point to select it. The missing anchor point reappears.
With your "Ctrl/Command" key still held down so you still have access to the Direct Selection Tool, try resizing each direction handle by clicking on the end of each one to select it and then dragging it towards and away from its anchor point. Again, hold "Shift" as you drag to constrain your movement horizontally, and watch what happens. As you increase the length of a handle, you get more of a curve, and as you decrease its length, you get less of a curve. Also notice that each handle controls its own side of the curve. The handle on the left controls the curve coming into the anchor point from the left, and the handle on the right controls the curve flowing out from the anchor point on the right.
Here, I've made my handle on the left shorter, and as we can see, there's much less of a curve now than there was originally, almost becoming a straight line. I've also made the handle on the right longer, and as a result, the curve on the right is now much more pronounced. The faint curve is the original for comparison:
Change the shape of the curves by resizing the direction handles. The left handle controls the left curve, and the right handle controls the right curve.
I'm going to undo my changes by pressing Ctrl+Alt+Z (Win) / Command+Option+Z (Mac) a couple of times to set my direction handles back to their original sizes so they're equal length once again. Now let's try rotating the handles. Hold down "Ctrl/Command" once again to access the Direct Selection Tool, then click on the end of either handle to select it and try rotating it around the anchor point. Since we selected the handle with "Ctrl/Command", both handles rotate together. Here I've dragged my left handle down and to the right, and the angle of the curve on the left changed along with it, now appearing as more of a slope as it rises up towards the anchor point. By dragging the left handle down and to the right, I caused the right handle to rotate up and to the left, and again, the angle of the curve on the right changed along with it, now rising above the anchor point briefly before making a steep decent down to the anchor point on the right. Again, the faint curve is the original for comparison:
Rotate the direction handles to change the angle of the curves. Select a handle while holding "Ctrl" (Win) / "Command" (Mac) to rotate both handles together.
The Dreaded "Loop"
One thing you want to avoid is rotating the handles too far, which will cause your path segments to overlap and create loops. Here, I've rotated my handles all the way around so that the left handle is now on the right and the right handle is on the left, and notice what's happened. My path segments are now overlapping each other, creating a loop:
Rotating the direction handles too far causes the path segments to overlap, creating an unwanted loop in the path.
Loops can be caused by rotating the direction handles too far, as I've done above, but more often than not, they're caused by a handle being too long, making the curve too long and causing it to overlap with itself. If that happens, which it does sometimes as you're drawing a path, simply shorten the length of the direction handle. Most people end up creating a whole bunch of loops in their path when they first start working with the Pen Tool, so don't think you're the only one. No need to panic or become frustrated though. As I said, the problem is most likely being caused by a direction handle being too long, and all you need to do is shorten the handle to "un loop" the loop!
I'm going to press Ctrl+Alt+Z (Win) / Command+Option+Z (Mac) a few times once again to undo my changes and reset my path back to the nice smooth arc I started with. Now, what about rotating the direction handles independently of each other? As we learned on the previous page, to rotate the handles separately, instead of selecting them with "Ctrl/Command", we simply select them while holding down Alt (Win) / Option (Mac), which gives us temporary access to the Convert Point Tool. Click on the end of a handle to select it, then drag it with your mouse to rotate it and this time, the other handle will stay in place, breaking the connection between them.
Here, I've selected the handle on the right while holding "Alt/Option" and then rotated it down and to the left. Notice how once again, the angle of the path segment on the right changes to match the new direction of the handle, and this time, the handle on the left, along with the path segment on the left, both stay in place. My path now looks a bit like a shark fin:
Hold down "Alt" (Win) / "Option" (Mac) to temporarily access the "Convert Point Tool", then click on the end of a direction handle to select it and rotate it independently of the other handle.
Moving An Anchor Point
One thing we haven't looked at yet is how to move an anchor point. If you recall, I mentioned on the previous page that the Pen Tool is extremely forgiving, and one of the reasons for it, besides being able to rotate and resize our direction handles after we've created them, is that we can easily move anchor points from one spot to another if we need to. As we've already learned, anchor points anchor a path into place. The anchor points themselves, however, are not anchored into place. You can move an anchor point anywhere, anytime, and any path segments that are connected to it will move and adjust right along with it.
To move an anchor point, hold down Ctrl (Win) / Command (Mac) to temporarily access the Direct Selection Tool as we've already been doing, then simply click on the anchor point to select it and drag it to its new location with your mouse. Any path segments connected to it will move with it to the new location. Here, I've dragged my middle anchor point down a bit from its original location (again, the faint path marks the original location for comparison). Notice how the path itself has changed shape to adjust to the new location of the anchor point:
Hold down "Ctrl" (Win) / "Command" (Mac) and click on an anchor point to select it, then drag it to a new location. Any path segments connected to the point will move with it, changing shape as needed.
Normally, when outlining an object with a path to select it using the Pen Tool, you won't need to move to an anchor point quite as far as what I've done above, but it's very common to go back around your path after you've created it and nudge a few anchor points here and there to fine-tune the path. Once you've selected an anchor point, you can nudge it up, down, left or right using the arrow keys on your keyboard.
Combining Straight Paths With Curves
What if I didn't want both of my path segments to be curves? What if what I needed was for the first path segment to be curved, but the second one needed to be straight? Let's see how to do that. I'm going to delete my existing path and start over again. First, I'll click to add an anchor point to start things off. Then, just as before, I'll click to add a second anchor point up and to the right of my initial point, and this time, I'll drag out direction handles, which will create a curved path connecting the two points, giving me exactly what I had way up at the start of this page:
Click once to add an anchor point, then click to add a second anchor point and drag out direction handles to create a curve.
I now have my initial curve, but I want my next path segment to be straight. If I was to simply click somewhere to add another anchor point right now, I would get another curve because I have that direction handle extending out from the right side of the last anchor point I added. What I need to do is get rid of that one direction handle. Without a direction handle controlling the angle and length of a curve, we get a straight line.
To remove the handle, leaving only the handle on the left of the anchor point, all I need to do is hold down Alt (Win) / Option (Mac), which will again temporarily switch me to the Convert Point Tool, and then I just click directly on the anchor point. When I do, the direction handle on the right disappears, leaving only the one on the left:
Hold down "Alt" (Win) / "Option" (Mac) and click directly on the anchor point to remove the direction handle on the right, leaving only the one on the left.
Now, with the direction handle gone, if I click to add a new anchor point, I get a straight path segment between the two points :
With the direction handle on the right now gone, clicking to add a new anchor point adds a straight path segment between the two points.
I now have a curved path segment on the left and a straight one on the right! What if I wanted the exact opposite? Suppose I needed to start with a straight path segment and then follow it with a curve? To do that, first I'll start by clicking to add an initial anchor point. Then, since I want a straight path segment, all I need to do is click somewhere else to add a second anchor point, and I automatically get a straight path connecting the two points:
Click with the Pen Tool to add an initial anchor point, then click again somewhere else to add a second anchor point and create a straight path segment between them.
I'm going to keep my mouse button held down after clicking to add my second anchor point because I want my next path segment to be curved, and we know that in order to create a curve, we need a direction handle. To add a handle extending out from the right of my anchor point, I'm going to hold down Alt (Win) / Option (Mac), and with my mouse button still down, I'm simply going to to drag to the right of the anchor point. As I do, a direction handle will drag out along with it:
Hold down "Alt" (Win) / "Option" (Mac) and drag out a direction handle on the right of the anchor point.
Notice that the direction handle extended only from the right of the anchor point, not from both sides, leaving my straight path segment on the left in place. And now that I have my direction handle on the right, all I need to do to create my curve is click to add a third point:
Click to add a third anchor point, which creates a curved path segment between the previous anchor point and the new one.
And there we go! I now have a straight path segment on the left, followed by a curved segment on the right. Of course, most paths you draw are going to consist of more than just three anchor points. Let's say I wanted to continue this path, moving in the same general direction towards the right, and I want my next path segment to be curved as well. Just as I did a moment ago, I would leave my mouse button held down after clicking to add my third point. I would hold down Alt (Win) / Option (Mac) and I would drag out another direction handle. So far, we've only been dragging handles out towards the right, but what you really want to do is drag your handles out in the general direction you want the curve to follow. I want to create a curve that goes up and to the right, so I'm going to drag out a small handle in that same general direction:
Drag out your direction handles in the general direction of the curve.
Порада! A good practice to get into is to keep your direction handles small when first dragging them out, since you never really know how long or at what exact angle they need to be until the actual curve appears, and the curve doesn't appear until you've added both of its anchor points. Once you've added both points and the curve appears, you can easily go back and make any adjustments you need to the handles. You may even want to wait until you've drawn the entire path before worrying about adjusting the handles.
With my direction handle created, I'm going to click to add a fourth anchor point, and I'm going to drag out direction handles from it as well:
Adding a fourth anchor point along with direction handles extending from it.
I now have a third segment added to my path, this one being a curve. Notice that this curve actually has two direction handles controlling it, one extending from the right of my third anchor point and one extending from the left of my fourth point:

The third path segment now has two direction handles, one on either end, working together to control the curve.
The overall shape of this curve is now being controlled by the length and direction of both of these handles. Watch what happens to the curve when I move the handles. I'll drag the bottom handle down and to the right, and I'll drag the top handle up and to the left. I'll also drag both of these handles longer. The faint curve is the original for comparison:
Changing the direction and/or length of either handle changes the overall shape of the curve. After rotating and lengthening both handles, the curve now appears in an "S" shape.
The curve is now a bit "S" shaped, and that's because the bottom handle is controlling the angle and length of the curve as it flows out from the third anchor point, while the top handle is controlling the angle and length of the curve as it flows into the fourth point. Changing the length and/or direction of either handle will change the overall shape of the curve.
I'm going to press Ctrl+Alt+Z (Win) / Command+Option+Z (Mac) a couple of times to undo the changes I made, so the curve is once again in a simple arc shape as it was a moment ago, and I think I'll finish off this path with another straight segment, which means I'll need to remove that direction handle extending out from the right side of the fourth anchor point. We've already learned how to do that, by holding down Alt (Win) / Option (Mac) and clicking directly on the anchor point itself:
Hold down "Alt" (Win) / "Option" (Mac) and click directly on the anchor point to remove the direction handle on the right.
With the direction handle gone, all I need to do now to add a straight path segment is click to add another anchor point:
The direction handle on the right is now gone, so we can add a straight path segment simply by clicking to add another anchor point.
We could continue this path for as long as we wanted, adding more straight segments and curves, but I think we'll stop here because we've pretty much covered everything we need to know about drawing paths with the Pen Tool at this point. That was a lot of information to take in, especially if this is your first time learning about paths. As I mentioned at the beginning, you won't become a Pen Master simply by reading through this tutorial, just as you won't learn how to ride a bike, or drive a car, learn to swim, or play the piano simply by reading about it. But hopefully you have some sense at this point of how to draw paths with the Pen Tool, how to draw straight path segments, how to draw curves by dragging out direction handles, how to change the length and angle of the curve by rotating and resizing the handles, and how to combine straight and curved segments in a path.
To finish off our look at making selections with the Pen Tool, let's see a practical example of how to select an object with curves.
Here, we have a photo of a couple of dolphins leaping out of the water. Definitely a couple of very curvy creatures:

A photo of two dolphins jumping out of the water.
Let's say we want to select these dolphins so we can use them for a design or a collage, or whatever the case may be. If you were to try selecting them with the Lasso Tool, which is most likely what you would end up using if you didn't know how to use the Pen Tool, not only would you have a tough time, you'd have an even tougher time trying to convince yourself that you were happy with the results when you were done. The reason is because the Lasso Tool simply isn't capable of making curved selections very well. The biggest problem with it, besides being a pixel-based selection tool, is that it relies on you having a steady enough hand to move it smoothly around the curves. Even if you don't suffer from a caffeine addiction, you could drive yourself crazy trying to draw a perfectly smooth curve with your mouse, or even with a pen tablet, and when you've finally given up, you'll still be left with a selection full of rough, jagged edges that just scream "amateur!". No one likes to be called an amateur, especially when there's no need for it thanks to the Pen Tool!
Examine The Object First
Whenever you're about to select something with the Pen Tool, before you begin, take a moment to examine the object carefully to get a sense of where you're going to need to place your anchor points. Forget about all the details in the object and focus only on its shape. Where are the areas where the shape changes direction? Which parts of the shape are straight? Which parts are curved? If there's a curve, is it a smooth, continuous arc or does the angle change at a spot along the curve? Visualize in your mind where you're going to need to place your anchor points, because when you place one, you always want to be thinking about the next one and what the path segment between the two points needs to look like.
A Tool Of Elegance
One more thing to keep in mind is that the Pen Tool is meant to be a tool of elegance . It's not a nail gun or a staple gun. You don't want to just go clicking around your shape adding anchor points all "willy nilly" (that's a technical term). When using it to draw curves, you want those curves to be nice and smooth, otherwise we might as well just stick with the Lasso Tool. To keep the curves flowing smoothly, we need to limit the number of anchor points we use to create them. That's why you want to take a moment to examine the object first and visualize where the anchor points need to be. If you can outline a large section of the shape using only one curve with an anchor point on either end, that's what you want to do, because that's what's going to give you the kind of results you're looking for. The kind of results that scream "definitely not an amateur!".
Let's select these dolphins. I'm going to start my path in the middle of the photo, at the spot where the side of the dolphin on the left overlaps the rear flipper of the dolphin on the right. There's no right or wrong place to begin a path. This is just where I've decided to start. The first part of that rear flipper is straight, so since I don't need a direction handle to create a straight path segment, I'm simply going to click once with my Pen Tool to add my first anchor point, which will serve as the starting point for my path:
Adding the first anchor point.
As I mentioned earlier, you'll probably find it helpful to zoom in on your image as you're drawing your path. To scroll the image around on the screen as you're zoomed in, hold down the spacebar, which will switch you temporarily to the Hand Tool and allow you to move the image around on the screen by clicking and dragging it.
The top of that flipper actually has a slight curve to it as it approaches the dolphin's tail section, so for my second anchor point, I'm going to click at the point where the flipper and tail section meet, and I'm going to drag out short direction handles, dragging up and to the right in the direction that the tail section is moving. Notice that I've now created a slight curve along the flipper:
Adding the second anchor point and dragging out small direction handles to add a slight curve to the first path segment.
As I continue up along the tail, I can see that it stays straight for a short distance, followed by a curve to the right, so I'm going to click to add a third anchor point at the spot where the curve begins. This gives me a straight path segment between the previous point and the new one. I know there's a short direction handle extending out from the previous anchor point, which normally means that my new path segment will be a curve, not a straight section, but because the handle is so short and is also moving in the same direction as the path segment, there is no noticeable curve to it. Consider it a "mostly straight" path segment:
Clicking to add the third anchor point, creating a (mostly) straight path segment.
Continuing along, we come to the first real curve in our path. For this, I'm going to need to drag out a direction handle from the anchor point I just added, so I'm going to hold down Alt (Win) / Option (Mac), then drag out a handle in the general direction where I want the curve to flow as it starts. Notice how I'm only dragging out a handle from the one side of the anchor point, not both:
Hold "Alt" (Win) / "Option" (Mac) to drag out a direction handle from one side of an anchor point.
To add the curve, I'll click and drag at the spot where the curve ends, shaping the curve as I drag out the handles until it matches the curve of the dolphin's tail. If I needed to, I could also go back and change the length and direction of the handle at the start of the curve to fine-tune it, but in this case, I don't need to do that:
Adding an anchor point at the opposite end of the curve and dragging out direction handles from it, rotating and resizing them as needed until the curve matches the curve of the object.
The next area of the dolphin is pretty straight, right up until its back begins to merge with its dorsal fin, at which point there's another curve, so I'm going to click to add an anchor point just before the curve up the dorsal fin begins, which is going to give me another "mostly straight" path segment between the previous point and the new point. Then I'm going to once again hold down Alt (Win) / Option (Mac) and drag out a direction handle as I prepare for my next path segment which will be curved:
Click to add an anchor point, then hold down "Alt" (Win) / "Option" (Mac) and drag out a direction handle to prepare for the next path segment.
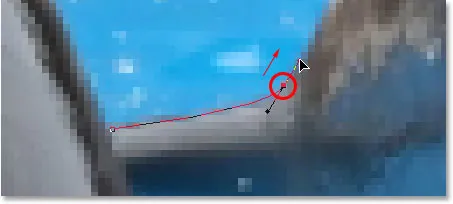
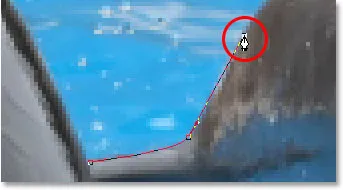
The left side of the dorsal fin consists mainly of one continuous curve upward until it gets near the very top, at which point the shape changes, so to create this curve, I'm going to click and drag at the point near the top where the curve will change direction. As we can see in the screenshot, this adds a curved path segment between the previous anchor point and the new one, but the curve is not yet following along the shape of the fin. It's going to need some fine-tuning:
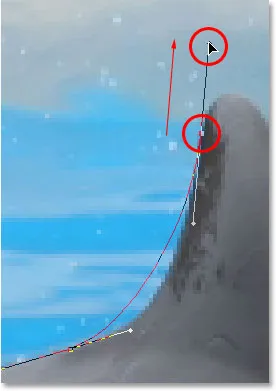
Adding a curve along the left side of the dorsal fin. The curve still needs some adjusting.
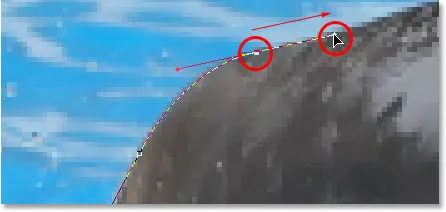
To adjust the curve, I'm simply going to hold down the Ctrl (Win) / Command (Mac) key, which gives me temporary access to the Direct Selection Tool, and I'm going to drag the handle extending out from the bottom anchor point towards the right to lengthen it, which is going to pull the angle of the curve in towards the right along with it, lining it up nicely with the curve of the fin. I've also rotated the top direction handles slightly in a clockwise direction just to be nit-picky, but the majority of the adjustment was done using the bottom direction handle:
Adjust the curve by adjusting its direction handles.
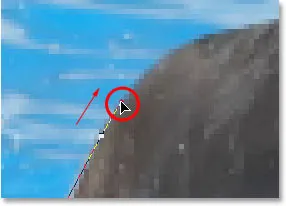
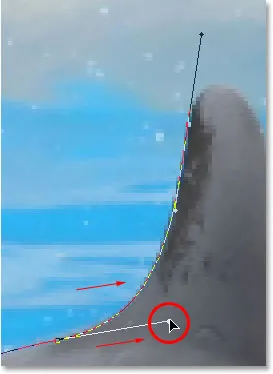
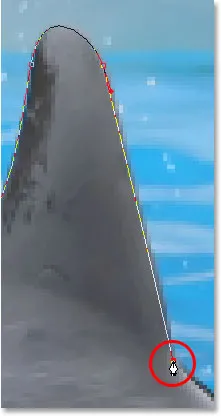
To add a curve around the top of the fin, I'll click and drag on the opposite side of it to add another anchor point with short direction handles. Notice though that we run into a bit of a problem. The direction handle on the left side of the curve is too long and it's pulling the curve away from the top of the fin:
The direction handle on the left of the curve is too long, resulting in the curve not following the shape of the fin.
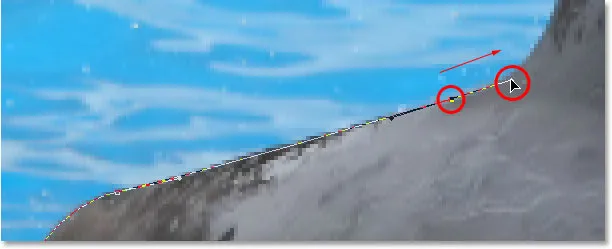
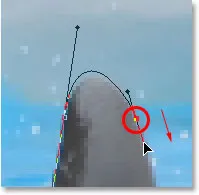
To fix that, all I need to do is once again hold down Ctrl (Win) / Command (Mac), then click on the end of the handle to select it and drag it shorter until the curve is the proper shape:
Shortening the length of the direction handle to adjust the shape of the curve.
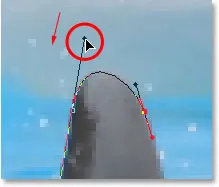
Let's finish creating our path around the dorsal fin. The remainder of the fin is basically a straight line, so I'm going to click at the base of the fin to add another anchor point which adds the straight path segment, completing our path around the fin:
Adding an anchor point at the base of the fin to finish drawing the path around it.
Since you and I would both be here all day if I was to continue commenting on every anchor point, direction handle and path segment as we make our way slowly around the dolphins, and since we've covered everything we need to know at this point, I'm going to go ahead and draw the rest of the path, outlining both dolphins:
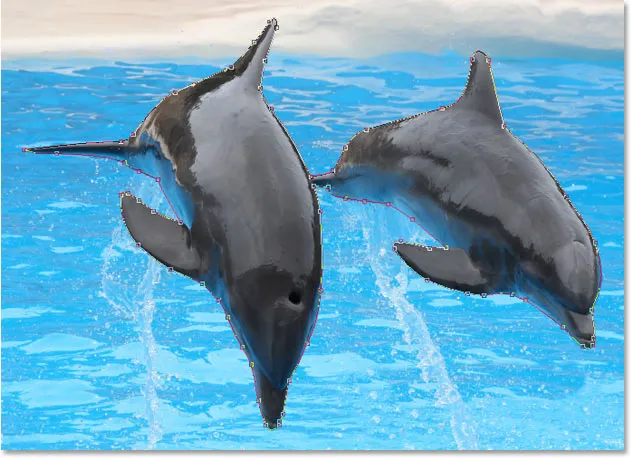
Both dolphins are now outlined by the path.
The dolphins have now been outlined with the path, and if we look at the Paths palette, we can see that sure enough, we have a path in the shape of the dolphins:
Photoshop's Paths palette showing the outline of the dolphins in the preview thumbnail.
As we've learned, Photoshop automatically names the path "Work Path", which means it's temporary and will be replaced if we start a new path. If you wanted to save it, you would need to double-click on the name "Work Path" and rename it to something else, like "Dolphins" in this case. I'm not going to worry about that, since I have no need to save it. All I want to do at this point is convert my path into a selection, and since I'm already in the Paths palette, I'll do that by clicking on the Load path as selection icon at the bottom of the palette:
Clicking the "Load path as selection" icon at the bottom of the Paths palette.
I could also have used the keyboard shortcut Ctrl+Enter (Win) / Command+Return (Mac) . Either way converts my path into a selection, and if I look at my photo, I can see that my path has indeed become a selection around the dolphins:

The path around the dolphins has now been converted into a selection.
Куди йти далі …
І там ми його маємо! The dolphins are now selected and ready for whatever plans we have for them. And with that, we wrap up our look at drawing paths and making selections with the Pen Tool in Photoshop! Докладніше про інструменти вибору програми Photoshop дивіться в розділі Як зробити вибір у серії Photoshop. Відвідайте наш розділ Основи Photoshop для отримання додаткових тем Photoshop!